Learn how to join yarn seamlessly using the Magic Knot – a strong, invisible knot perfect for any crochet or knitting project.
Looking for a way to join two yarns together seamlessly without bulky knots or loose ends? Meet The Magic Knot – Invisible Yarn Join – a clever, strong, and nearly invisible method to change yarn colors or skeins in crochet or knitting. Perfect for beginners! Don’t forget to check out the video tutorial on our YouTube channel to see this technique in action.
What Is The Magic Knot – Invisible Yarn Join?
The Magic Knot is a clever way to tie two pieces of yarn together, forming a tiny, tight knot that won’t come undone – and most importantly, won’t show in your project! It’s used to:
- Join a new skein when one runs out
- Switch yarn colors without bulky transitions
- Simplify your work by avoiding weaving ends
This makes it ideal for beginners and experienced crafters alike!
Why Use The Magic Knot – Invisible Yarn Join?
Clean & Seamless Finish
One of the biggest advantages of the Magic Knot is how clean your work looks. The knot is so small it’s virtually invisible when woven into your stitches.
Saves Time
No more stopping to weave in ends for every yarn change. Just tie, trim, and keep going!
Beginner-Friendly
This technique is super easy to learn. Even if you’re just starting, you can master it in minutes.
Step-by-Step Guide – The Magic Knot – Invisible Yarn Join
Materials Needed:
- Two strands of yarn (can be different colors or the same)
- Scissors
Step 1 – Align the Yarn Ends
Place the two yarns parallel to each other, with approximately 6 inches of overlap.
Step 2 – Tie the First Knot
Using Yarn A, wrap it over and around Yarn B, then pull through to make a knot. Slide it close to the center.
Step 3 – Tie the Second Knot
Now do the same with Yarn B – wrap it over and around Yarn A and pull tight.
Step 4 – Pull Both Ends
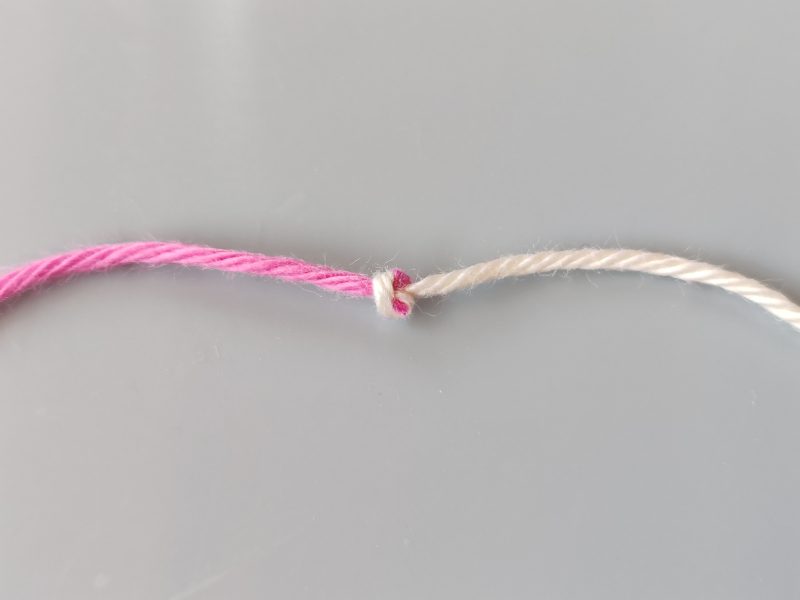
Hold both yarns and pull them in opposite directions. The knots will slide together and lock.
Step 5 – Trim the Tails
Snip the excess close to the knot. Done!
Watch the Video for a Clearer View
Want to see the steps in action? Watch our full YouTube video tutorial on The Magic Knot – Invisible Yarn Join. It’s beginner-friendly and shows everything in slow motion.
The Magic Knot – Invisible Yarn Join
Common Uses for The Magic Knot
Knitting and Crochet Projects
Perfect for all yarn crafts where color changes or skein changes are needed.
Amigurumi & Colorwork
Eliminates messy ends when switching yarn colors in small shapes or patterns.
Multi-Color Blankets or Scarves
Great for striped projects where yarn changes are frequent.
Scrappy Yarn Projects
Combine leftover yarn bits without worrying about lots of weaving.
Tips for Success
Always Test the Knot Strength
Pull firmly before trimming to make sure it’s secure.
Don’t Use with Slippery Yarn
The Magic Knot works best with wool, acrylic, or cotton; it is not recommended for silk or bamboo.
Practice Before Using on Big Projects
Try it out a few times on scrap yarn to get confident with the process.
For Absolute Beginners: Common Questions
Will the knot come undone?
No — as long as it’s tied correctly and tightly pulled, the Magic Knot is extremely secure.
Can I use this with all yarn types?
It’s best with standard yarns like wool and acrylic. Avoid with very slippery or delicate yarns.
Will it show in my finished project?
No! Once stitched over, the knot becomes virtually invisible — hence the name.
Extra Tips for Using the Magic Knot in Projects
Blend Colors Smoothly
When transitioning between colors, match the knot location with stitch changes to make color shifts even less noticeable.
Keep Yarn Ends Longer When Learning
Until you’re confident, leave longer tails. You can always trim more later.
Store Sample Knots
Create a few sample knots using different yarns for reference before starting a new project.
Final Thoughts
The Magic Knot 1 – Invisible Yarn Join is a true game-changer in the world of yarn crafts. Whether you’re knitting, crocheting, or creating colorful art pieces, this method makes life easier and your work cleaner.
If you’re tired of weaving ends or frustrated with messy joins, this is the technique to try. Combine it with our video tutorial, and you’ll be joining yarns like a pro in no time!